

Need help?{" "} Contact Support .
Check out our{" "} changelog .
Questions?{" "} Contact Sales .
LLM?{" "} Read llms.txt .
Let users buy Bitcoin and USDC directly in your app. First widget with Lightning Address support.
Send and receive instant payments globally. Lightning, on-chain, and fiat settlements.
Production-ready SDK with TypeScript examples and starter templates.
Enable AI agents and LLMs to process payments autonomously.
Unity SDK for adding Bitcoin rewards to your games. Drag, drop, monetize.
Programmatically distribute rewards. Perfect for tournaments and achievements.
OAuth2 authentication with built-in wallet creation and KYC.
White-label wallet app for players to manage and cash out rewards.
 ### What You Can Do With API Keys
 **How to Configure:**
1. Navigate to your project's API tab
2. Click "API Access Controls"
3. Add your server's IP addresses
4. Save changes
**How to Configure:**
1. Navigate to your project's API tab
2. Click "API Access Controls"
3. Add your server's IP addresses
4. Save changes

 1. **Access the Dashboard** - Use the link provided by our team
2. **Enter Your Information** - Fill in your user details
3. **Set a Strong Password** - Must include uppercase, lowercase, numbers, and symbols
4. **Accept Terms** - Review and accept our Terms of Service
1. **Access the Dashboard** - Use the link provided by our team
2. **Enter Your Information** - Fill in your user details
3. **Set a Strong Password** - Must include uppercase, lowercase, numbers, and symbols
4. **Accept Terms** - Review and accept our Terms of Service
 ### Step 3: Verify Your Email
Check your inbox for a 6-digit verification code.
### Step 3: Verify Your Email
Check your inbox for a 6-digit verification code.

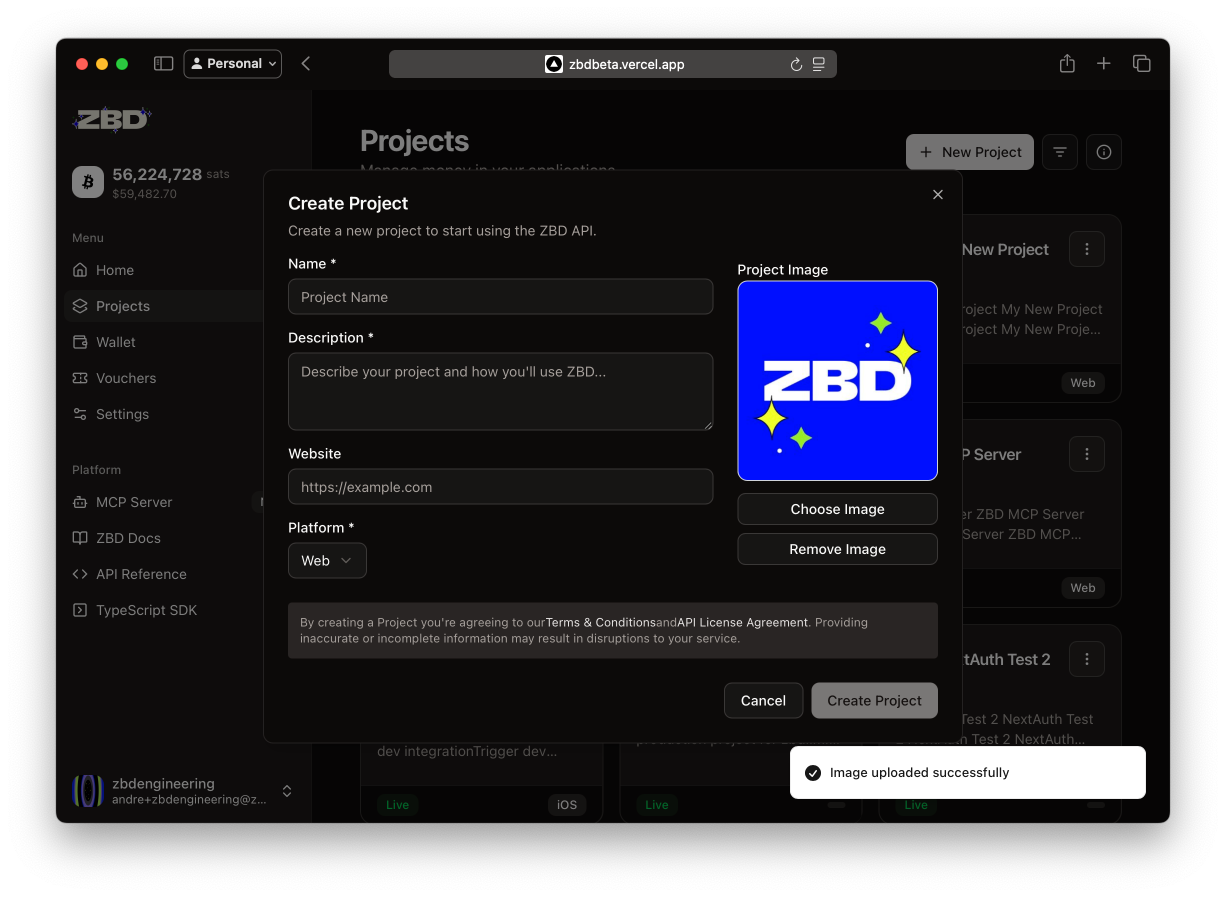 ### Step 2: Configure Your Project
Fill in your project details in the creation modal:
### Step 2: Configure Your Project
Fill in your project details in the creation modal:
 ### Step 3: Create and Explore
Click **Create Project** and you will be redirected to your new project's wallet page.
## What Happens Next
Once your project is created, you instantly get:
### Step 3: Create and Explore
Click **Create Project** and you will be redirected to your new project's wallet page.
## What Happens Next
Once your project is created, you instantly get:
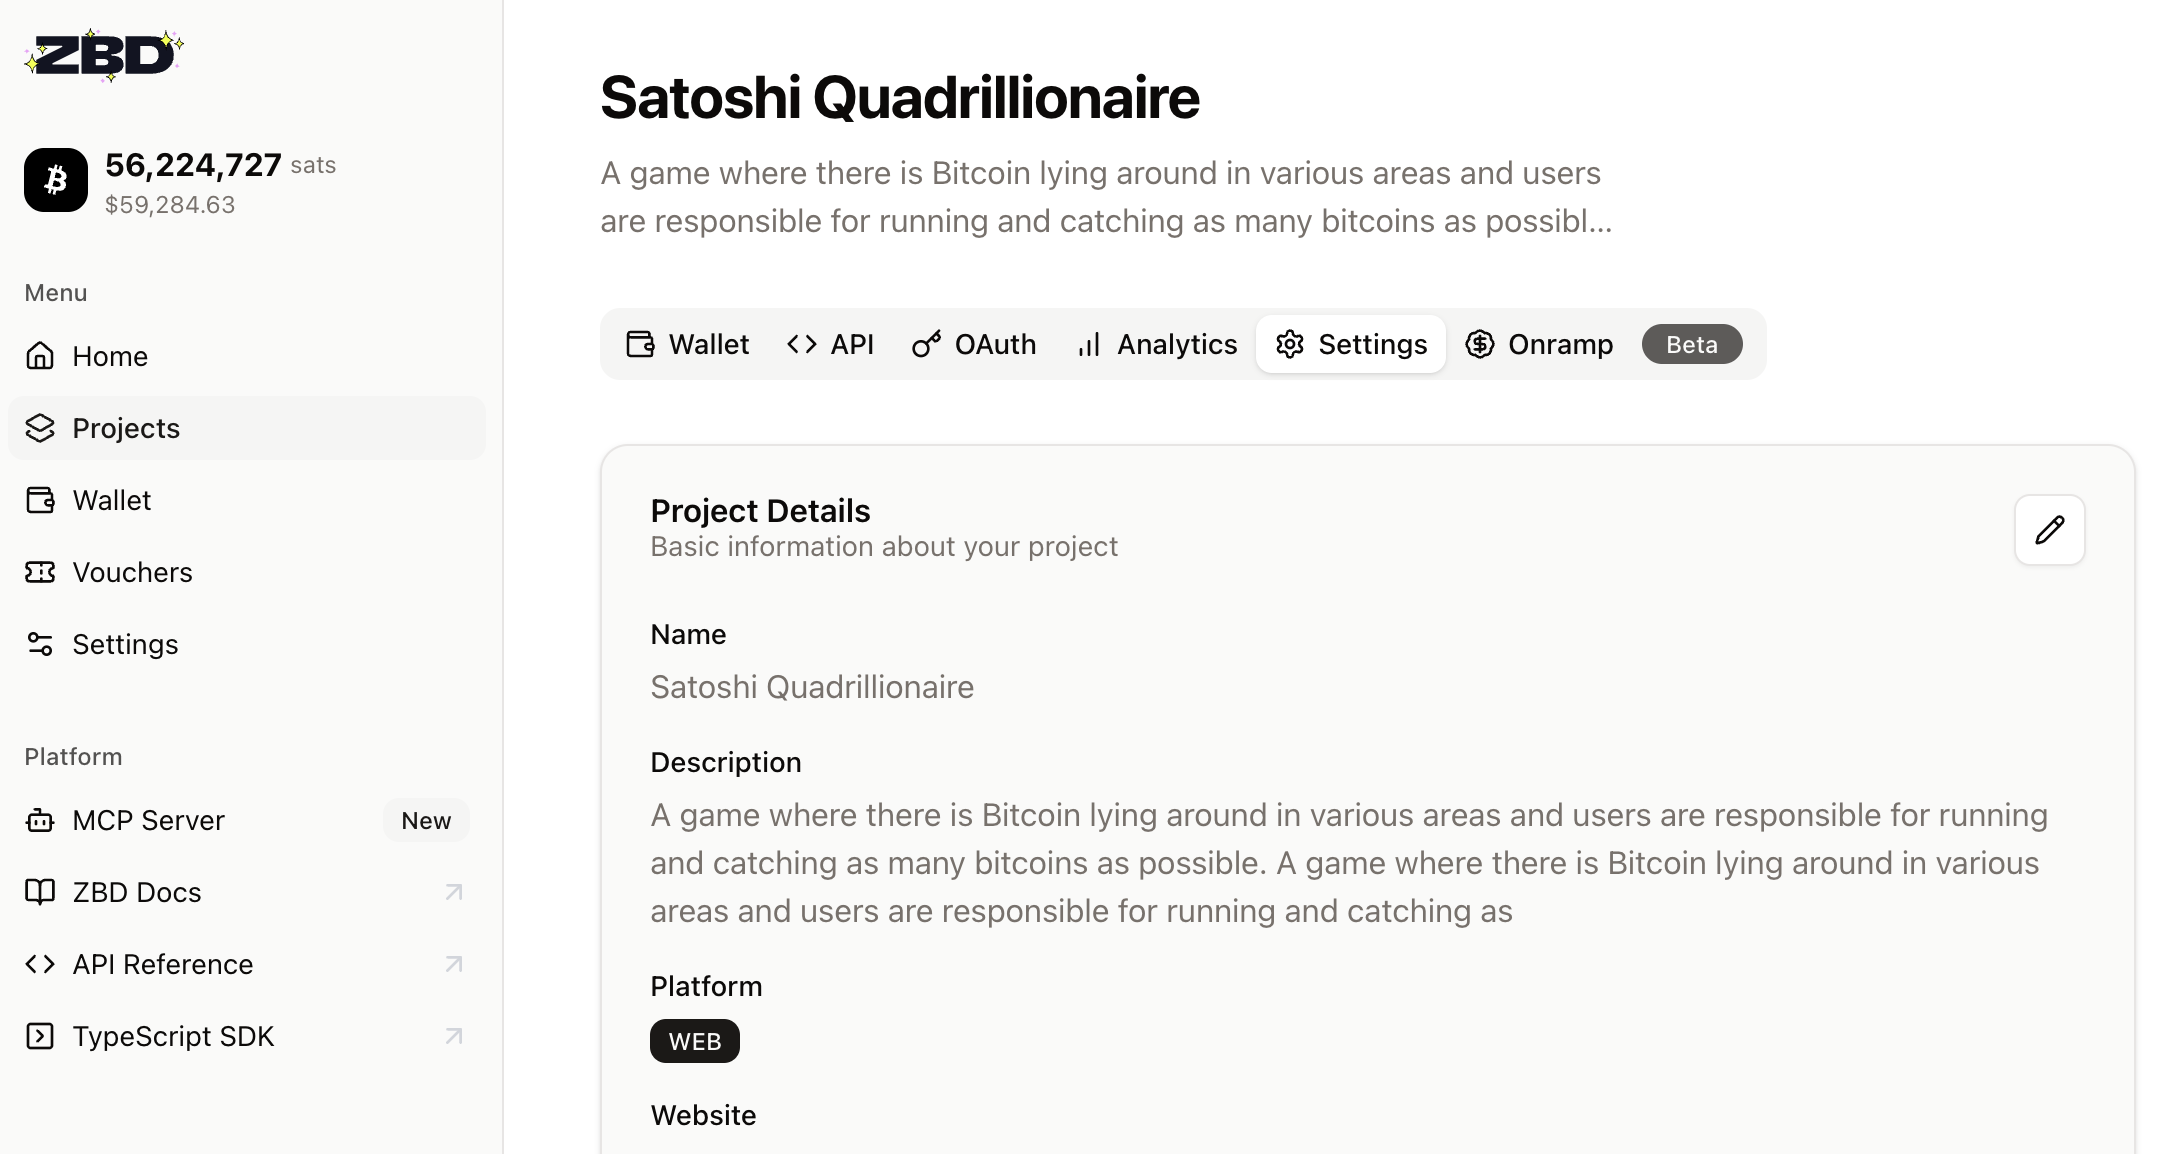
 The ZBD Developer Dashboard is where you manage everything – from API keys to real-time analytics. One dashboard to power payments across your entire platform.
## What You Get
The ZBD Developer Dashboard is where you manage everything – from API keys to real-time analytics. One dashboard to power payments across your entire platform.
## What You Get
 ## Archiving Projects
When a project is no longer needed, archiving keeps your dashboard clean while preserving records.
## Archiving Projects
When a project is no longer needed, archiving keeps your dashboard clean while preserving records.
 ## Wallet Management Best Practices
 Look for:
* 🧪 **"Sandbox" label** on project cards
* 🎮 **Test Bitcoin balance** (not real money!)
* 👥 **Test Users tab** only in sandbox
* 🔑 **Sandbox API endpoints** in documentation
## Sandbox Architecture
```mermaid
graph LR
A[Your App] -->|Sandbox API Key| B[ZBD Sandbox]
B --> C[Fake Lightning Network]
B --> D[Test User Wallets]
B --> E[Simulated Payments]
style B fill:#ffeb3b,stroke:#333,stroke-width:2px
style C fill:#fff9c4,stroke:#333,stroke-width:2px
style D fill:#fff9c4,stroke:#333,stroke-width:2px
style E fill:#fff9c4,stroke:#333,stroke-width:2px
```
## Getting Started with Sandbox
### Your First Sandbox Project
When you create your first project, you'll automatically get:
Look for:
* 🧪 **"Sandbox" label** on project cards
* 🎮 **Test Bitcoin balance** (not real money!)
* 👥 **Test Users tab** only in sandbox
* 🔑 **Sandbox API endpoints** in documentation
## Sandbox Architecture
```mermaid
graph LR
A[Your App] -->|Sandbox API Key| B[ZBD Sandbox]
B --> C[Fake Lightning Network]
B --> D[Test User Wallets]
B --> E[Simulated Payments]
style B fill:#ffeb3b,stroke:#333,stroke-width:2px
style C fill:#fff9c4,stroke:#333,stroke-width:2px
style D fill:#fff9c4,stroke:#333,stroke-width:2px
style E fill:#fff9c4,stroke:#333,stroke-width:2px
```
## Getting Started with Sandbox
### Your First Sandbox Project
When you create your first project, you'll automatically get:
 Each test user has:
* Unique ZBD Gamertag
* Test wallet with balance
* Ability to receive payments
* Full transaction history
**Example Test Users**:
```
- SandboxUser1#7823
- TestPlayer42#1337
- DevTester99#2024
```
## Topping Up Your Sandbox
Running low on fake satoshis? Add more instantly:
Each test user has:
* Unique ZBD Gamertag
* Test wallet with balance
* Ability to receive payments
* Full transaction history
**Example Test Users**:
```
- SandboxUser1#7823
- TestPlayer42#1337
- DevTester99#2024
```
## Topping Up Your Sandbox
Running low on fake satoshis? Add more instantly:

 ### 2. Send Test Payment
Use the API Playground or your own code:
### 2. Send Test Payment
Use the API Playground or your own code:
 Click on the transaction for full details:
 ## Transitioning to Production
Ready to handle real money? Here's your checklist:
## Transitioning to Production
Ready to handle real money? Here's your checklist:
 ### API Method
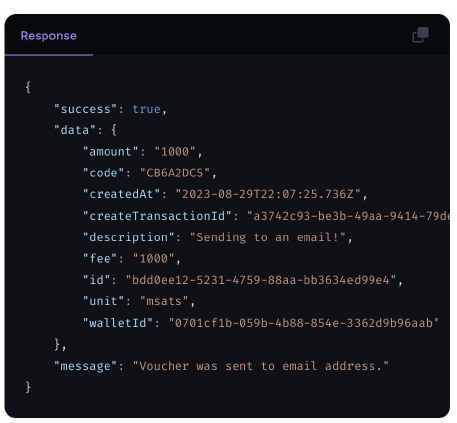
Redeem your gift with this code:
Redeem now!

 * Released AI Assistant for docs.zbdpay.com documentation
* Ask questions about any aspect of ZBD's documentation and integrations
* Get instant answers about SDK implementations and code examples
* Learn about country coverage and supported regions
* Understand integration options and best practices
* Explore product capabilities and features
* Get help troubleshooting common issues
* Available 24/7 to assist with documentation queries
* Released AI Assistant for docs.zbdpay.com documentation
* Ask questions about any aspect of ZBD's documentation and integrations
* Get instant answers about SDK implementations and code examples
* Learn about country coverage and supported regions
* Understand integration options and best practices
* Explore product capabilities and features
* Get help troubleshooting common issues
* Available 24/7 to assist with documentation queries

 The ZBD + Next.js Playground Starter Kit is an application codebase that allows you to quickly get started with ZBD and Next.js. It includes two main sections: a ZBD API Playground and a Starter Kit for ZBD-powered Next.js applications.
 Opening your browser (or another HTTP client) to the URL provided by Supabase: `https://xxxxxxxxxxxxx.supabase.co/functions/v1/zbd-receive` should return a JSON response with the payment request details.
You can also test this using curl command:
```bash
curl https://xxxxxxxxxxxxx.supabase.co/functions/v1/zbd-receive
```
You're looking for the `data.invoice.request` property in the JSON response. It starts with `lnbc1` and is the payment request anyone in the Bitcoin Lightning Network can use to pay you.
```
lnbc1u1pjdlax9pp5t7jhkd7h2wntd4f2v7xp22dknmjxp0q8nm7hfcny4p7a5mr7x3rsdp9f4hkueteypshggrfde6x2unwv46zqumsv4jkgcqzzsxqzjcsp5dsayu6m6632p28rnkeeqsr7d54amrkv6wh46yrv42gdgca8xl8gs9qyyssqgj2zrkax733rzulfkzc5mqsr8fpwrva82stpa7e0frw32722trv37jlq8mvlqfp8y75lr6mz63zd7qnxar8hhsehuy22pvfq6wjxwqqqa60lx3
```
Opening your browser (or another HTTP client) to the URL provided by Supabase: `https://xxxxxxxxxxxxx.supabase.co/functions/v1/zbd-send` should return a JSON response with the payment sent message.
You can also test this using curl command:
```bash
curl https://xxxxxxxxxxxxx.supabase.co/functions/v1/zbd-send
```
You're looking for the `status` of `completed` to know that the payment settled successfully.
Opening your browser (or another HTTP client) to the URL provided by Supabase: `https://xxxxxxxxxxxxx.supabase.co/functions/v1/zbd-receive` should return a JSON response with the payment request details.
You can also test this using curl command:
```bash
curl https://xxxxxxxxxxxxx.supabase.co/functions/v1/zbd-receive
```
You're looking for the `data.invoice.request` property in the JSON response. It starts with `lnbc1` and is the payment request anyone in the Bitcoin Lightning Network can use to pay you.
```
lnbc1u1pjdlax9pp5t7jhkd7h2wntd4f2v7xp22dknmjxp0q8nm7hfcny4p7a5mr7x3rsdp9f4hkueteypshggrfde6x2unwv46zqumsv4jkgcqzzsxqzjcsp5dsayu6m6632p28rnkeeqsr7d54amrkv6wh46yrv42gdgca8xl8gs9qyyssqgj2zrkax733rzulfkzc5mqsr8fpwrva82stpa7e0frw32722trv37jlq8mvlqfp8y75lr6mz63zd7qnxar8hhsehuy22pvfq6wjxwqqqa60lx3
```
Opening your browser (or another HTTP client) to the URL provided by Supabase: `https://xxxxxxxxxxxxx.supabase.co/functions/v1/zbd-send` should return a JSON response with the payment sent message.
You can also test this using curl command:
```bash
curl https://xxxxxxxxxxxxx.supabase.co/functions/v1/zbd-send
```
You're looking for the `status` of `completed` to know that the payment settled successfully.
 ### 2. Install [Beamable](https://beamable.com/?referral=zbd)
Follow the instructions [here](https://docs.beamable.com/docs/installing-beamable).
### 3. Download ZBD Unity Package
1. Go to the [GitHub repository](https://github.com/zebedeeio/beamable-starter/releases) and download the latest release `.unitypackage` file.
2. Drag and drop the file into the Unity project explorer to install the package.
### 4. Install Docker Desktop
[Docker Desktop](https://www.docker.com/) is needed to run and test the Microservice locally.
***
## [Beamable](https://beamable.com/?referral=zbd) Setup
### 1. Obtain ZBD API Key
To interact with the [ZBD API](/payments/api), you must obtain an [API Key](/get-started/api-keys) from your [ZBD Developer Dashboard](https://dashboard.zebedee.io/) account. If you are unsure about the process, see [this guide](/get-started/dev-dashboard) for step-by-step instructions.
### 2. Add ZBD API Key to your [Beamable](https://beamable.com/?referral=zbd) Project
You need to add the ZBD API Key to your project's Realm Configuration on Beamable. Please refer to [this guide](https://docs.beamable.com/docs/installing-beamable), which explains how to log in to [Beamable](https://beamable.com/?referral=zbd) and create a game. *If you are utilizing the ZBD / [Beamable](https://beamable.com/?referral=zbd) starter project, you can skip the installation steps and proceed directly to logging in and creating a game.*
1. In the [Beamable](https://beamable.com/?referral=zbd) Portal in the left side menu go to `Operate` -> `Config`
2. Add a new config by clicking `+ Add Config`
### 2. Install [Beamable](https://beamable.com/?referral=zbd)
Follow the instructions [here](https://docs.beamable.com/docs/installing-beamable).
### 3. Download ZBD Unity Package
1. Go to the [GitHub repository](https://github.com/zebedeeio/beamable-starter/releases) and download the latest release `.unitypackage` file.
2. Drag and drop the file into the Unity project explorer to install the package.
### 4. Install Docker Desktop
[Docker Desktop](https://www.docker.com/) is needed to run and test the Microservice locally.
***
## [Beamable](https://beamable.com/?referral=zbd) Setup
### 1. Obtain ZBD API Key
To interact with the [ZBD API](/payments/api), you must obtain an [API Key](/get-started/api-keys) from your [ZBD Developer Dashboard](https://dashboard.zebedee.io/) account. If you are unsure about the process, see [this guide](/get-started/dev-dashboard) for step-by-step instructions.
### 2. Add ZBD API Key to your [Beamable](https://beamable.com/?referral=zbd) Project
You need to add the ZBD API Key to your project's Realm Configuration on Beamable. Please refer to [this guide](https://docs.beamable.com/docs/installing-beamable), which explains how to log in to [Beamable](https://beamable.com/?referral=zbd) and create a game. *If you are utilizing the ZBD / [Beamable](https://beamable.com/?referral=zbd) starter project, you can skip the installation steps and proceed directly to logging in and creating a game.*
1. In the [Beamable](https://beamable.com/?referral=zbd) Portal in the left side menu go to `Operate` -> `Config`
2. Add a new config by clicking `+ Add Config`
 3. Add two Config Values:
| Namespace: | Key: | Value: | Notes: |
| ---------- | ------------ | ------------------ | --------------------------------------------------- |
| ZebedeeAPI | clientsecret | your client secret | This is only needed for the ZBD Login Example |
| ZebedeeAPI | apikey | your API Key | This is needed for any interaction with the ZBD API |
3. Add two Config Values:
| Namespace: | Key: | Value: | Notes: |
| ---------- | ------------ | ------------------ | --------------------------------------------------- |
| ZebedeeAPI | clientsecret | your client secret | This is only needed for the ZBD Login Example |
| ZebedeeAPI | apikey | your API Key | This is needed for any interaction with the ZBD API |

 Here is an example of how your Realm configuration should look:
 💡 **Note:** To use the provided sample Microservice, you must use these exact namespace and key values.
***
## Run Microservices Locally
By leveraging Microservices, we are securing our ZBD API Key by moving it from the game client to a server.
Before testing the Microservices, we need to run it locally.
### 1. Open Microservices Manager
In Unity, go to `Window` -> `Beamable` -> `Open Microservices Manager`
💡 **Note:** To use the provided sample Microservice, you must use these exact namespace and key values.
***
## Run Microservices Locally
By leveraging Microservices, we are securing our ZBD API Key by moving it from the game client to a server.
Before testing the Microservices, we need to run it locally.
### 1. Open Microservices Manager
In Unity, go to `Window` -> `Beamable` -> `Open Microservices Manager`
 💡 **Note:** Here you will see the `ZebedeeMicroservice`
 💡 **Note:** If you see this warning, make sure you have Docker installed.
 ### 2. Run Microservice
Hit the `Play` button.
***
## Publish Microservices on [Beamable](https://beamable.com/?referral=zbd) Platform
When you are ready to test on other devices (outside of Unity editor), you will need to publish your Microservice to [Beamable](https://beamable.com/?referral=zbd).
### 1. Open [Beamable](https://beamable.com/?referral=zbd) Publish Window
In the `Microservices Manager` tab in Unity, click `Publish`.
### 2. Run Microservice
Hit the `Play` button.
***
## Publish Microservices on [Beamable](https://beamable.com/?referral=zbd) Platform
When you are ready to test on other devices (outside of Unity editor), you will need to publish your Microservice to [Beamable](https://beamable.com/?referral=zbd).
### 1. Open [Beamable](https://beamable.com/?referral=zbd) Publish Window
In the `Microservices Manager` tab in Unity, click `Publish`.
 ### 2. Publish Select Microservices
In the `Publish` window, toggle on which Microservice(s) you want published, then click `Publish`. This will deploy your Microservice(s) to [Beamable](https://beamable.com/?referral=zbd)'s platform.
### 2. Publish Select Microservices
In the `Publish` window, toggle on which Microservice(s) you want published, then click `Publish`. This will deploy your Microservice(s) to [Beamable](https://beamable.com/?referral=zbd)'s platform.
 ### 3. View Microservices Status
Validate the applicable Microservice(s) are running by viewing the `Microservices` tab in the [Beamable](https://beamable.com/?referral=zbd) Portal.
### 3. View Microservices Status
Validate the applicable Microservice(s) are running by viewing the `Microservices` tab in the [Beamable](https://beamable.com/?referral=zbd) Portal.
 💡 For more details on publishing Microservices, check out the [Beamable](https://beamable.com/?referral=zbd) documentation [here](https://docs.beamable.com/docs/microservices-distributing).
At this point, your game can now connect the published Beamable Microservice(s), which protects your ZBD API Key from the game client!
***
## Integrating the Microservices
To see sample code for how to integrate [Beamable](https://beamable.com/?referral=zbd) Microservices, view the `MyController.cs` file in the scripts directory of the ZBD Unity Package within Unity. Insert this code in applicable area(s) of your game; e.g. when you're [Sending sats to a ZBD Gamertag](/payments/api/gamertags/send).
To get data that needs to be secure from [Beamable](https://beamable.com/?referral=zbd) (as we do for the `apikey` and `clientsecret`), you can reference the code in `Config.cs` and the `GetAPIKey` function in `ZebedeeMicroservice.cs`.
```csharp
// This code ensures that the Beamable Microservice is ready
var ctx = BeamContext.Default;
await ctx.OnReady;
// This line makes the call to the Microservice
var result = await ctx.Microservices().ZebedeeMicroservice().GetWallet();
// Here we take the string and convert it to a response object
// The ZBD sdk has a response object for all responses.
// This allows you to easily get the data you need.
var jsonObject = JsonConvert.DeserializeObject
💡 For more details on publishing Microservices, check out the [Beamable](https://beamable.com/?referral=zbd) documentation [here](https://docs.beamable.com/docs/microservices-distributing).
At this point, your game can now connect the published Beamable Microservice(s), which protects your ZBD API Key from the game client!
***
## Integrating the Microservices
To see sample code for how to integrate [Beamable](https://beamable.com/?referral=zbd) Microservices, view the `MyController.cs` file in the scripts directory of the ZBD Unity Package within Unity. Insert this code in applicable area(s) of your game; e.g. when you're [Sending sats to a ZBD Gamertag](/payments/api/gamertags/send).
To get data that needs to be secure from [Beamable](https://beamable.com/?referral=zbd) (as we do for the `apikey` and `clientsecret`), you can reference the code in `Config.cs` and the `GetAPIKey` function in `ZebedeeMicroservice.cs`.
```csharp
// This code ensures that the Beamable Microservice is ready
var ctx = BeamContext.Default;
await ctx.OnReady;
// This line makes the call to the Microservice
var result = await ctx.Microservices().ZebedeeMicroservice().GetWallet();
// Here we take the string and convert it to a response object
// The ZBD sdk has a response object for all responses.
// This allows you to easily get the data you need.
var jsonObject = JsonConvert.DeserializeObject ### 2. Ensure Microservices are Published
If you haven't already, you will need to publish your Microservice(s) to [Beamable](https://beamable.com/?referral=zbd). Once your Microservice(s) are published, you will be able to use it from anywhere. See [Publish Select Microservices](#2-publish-select-microservices) for more details.
### 3. Build for Android
You can now build your game for Android. Learn more [here](https://docs.unity3d.com/Manual/android-BuildProcess.html).
***
## Troubleshooting
### General Issues
If you are experiencing any issues here are a few things to check:
* **Make sure you are logged in to [Beamable](https://beamable.com/?referral=zbd) in the Unity Editor**
### 2. Ensure Microservices are Published
If you haven't already, you will need to publish your Microservice(s) to [Beamable](https://beamable.com/?referral=zbd). Once your Microservice(s) are published, you will be able to use it from anywhere. See [Publish Select Microservices](#2-publish-select-microservices) for more details.
### 3. Build for Android
You can now build your game for Android. Learn more [here](https://docs.unity3d.com/Manual/android-BuildProcess.html).
***
## Troubleshooting
### General Issues
If you are experiencing any issues here are a few things to check:
* **Make sure you are logged in to [Beamable](https://beamable.com/?referral=zbd) in the Unity Editor**
 * **Make sure you have the correct game selected in the [Beamable](https://beamable.com/?referral=zbd) plugin within Unity**

 * **Ensure you are in the correct [Beamable](https://beamable.com/?referral=zbd) Realm (environment) in Unity**
 ### 403 Errors
These issues are usually caused by an improper Docker or Microservice setup.
A few things to check:
* **Docker is installed correctly and running**
* **The Microservice is running locally when developing (this can be checked by the play button being highlighted in the Microservices tab in Unity)**
### 403 Errors
These issues are usually caused by an improper Docker or Microservice setup.
A few things to check:
* **Docker is installed correctly and running**
* **The Microservice is running locally when developing (this can be checked by the play button being highlighted in the Microservices tab in Unity)**
 * **If you are expecting a `Published` Microservice, ensure the Microservice is published and deployed to the correct Realm from the [Beamable](https://beamable.com/?referral=zbd) Portal.**
# OAuth2 Login with ZBD in Unity
Source: https://docs.zbdpay.com/rewards/knowledge-base/integrations/unity
How to integrate Login with ZBD into a Unity app
* **If you are expecting a `Published` Microservice, ensure the Microservice is published and deployed to the correct Realm from the [Beamable](https://beamable.com/?referral=zbd) Portal.**
# OAuth2 Login with ZBD in Unity
Source: https://docs.zbdpay.com/rewards/knowledge-base/integrations/unity
How to integrate Login with ZBD into a Unity app


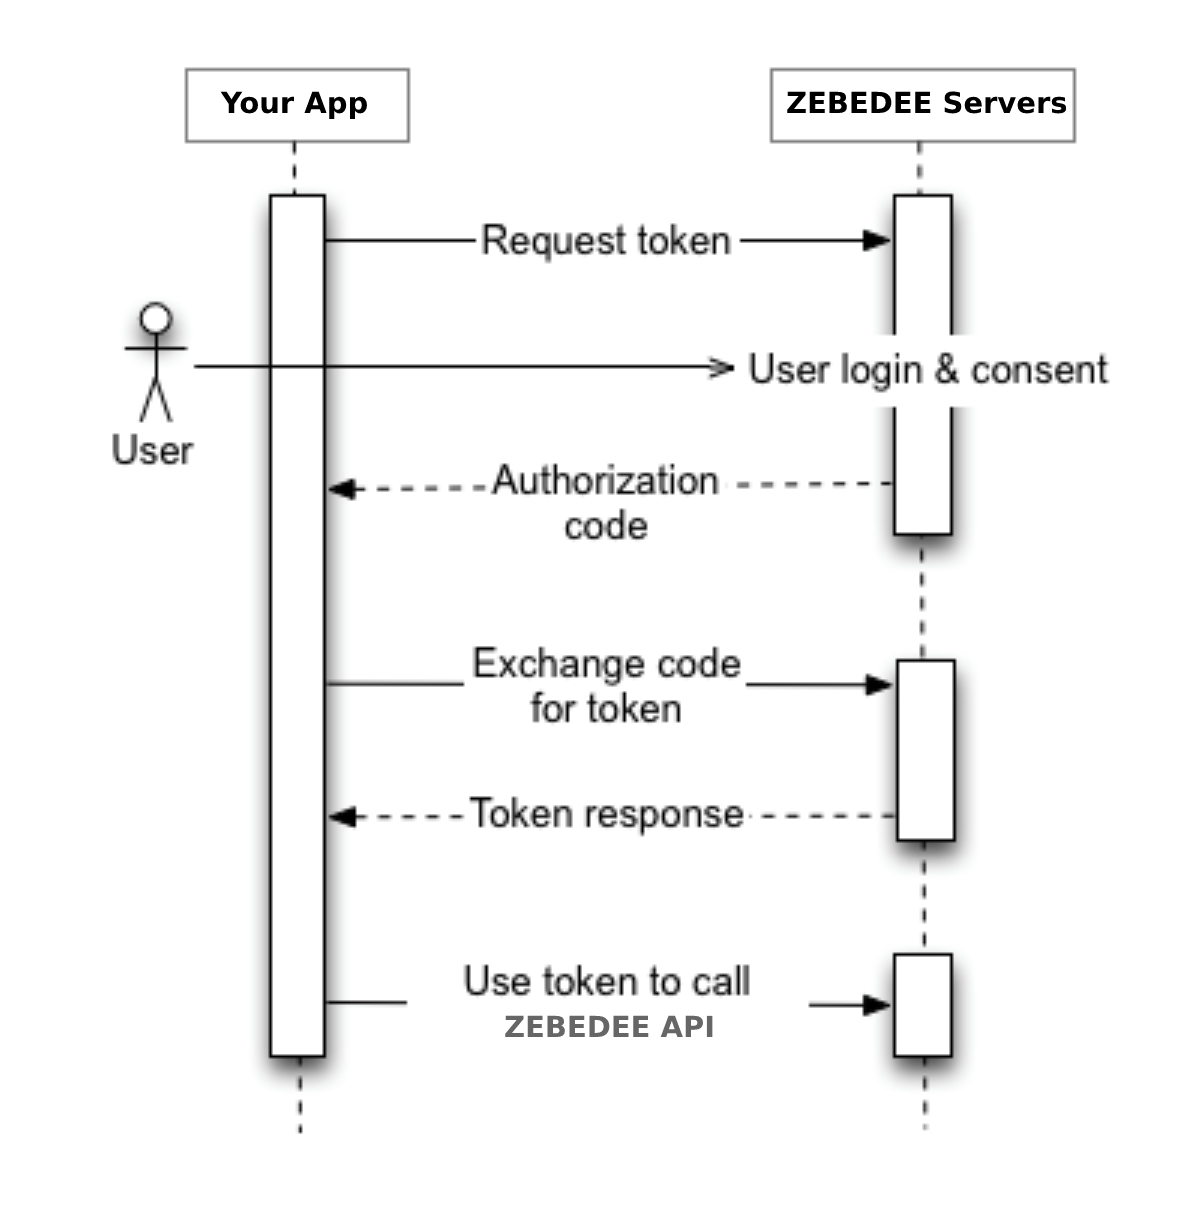
> After accessing the ZBD login portal URL and successfully authenticating, the user will be redirected back to your application with `state` and `code` query parameters included. These two properties allow you to hit the `token` endpoint, and get the user's `accessToken`.
### Getting the Token
* Token: `POST` [https://api.zebedee.io/v1/oauth2/token](https://api.zebedee.io/v1/oauth2/token)
* Once you have the `code` returned from the previous `authorization` endpoint, you must now make a `POST` request to the token endpoint, with the following properties:
```json
{
"client_id": "{{client_id}}",
"client_secret": "{{client_secret}}",
"code": "{{code}}",
"code_verifier": "{{code_verifier}}",
"grant_type": "authorization_code",
"redirect_uri": "{{your_url_callback}}"
}
```
* And, as response, you should receive the user's `accessToken`:
```json
{
"accessToken": "{{userAccessToken}}"
}
```
### Getting ZBD User Profile Data
* Profile: `GET` [https://api.zebedee.io/v1/oauth2/user](https://api.zebedee.io/v1/oauth2/user)
* You can now call the ZBD API endpoints passing the provided `accessToken` from the previous endpoint on the request authorization header.
```json
Response: {
"data": {
"email": "testzebedee2@gmail.com",
"gamertag": "testzebedee",
"id": "6109484f-08e6-479a-a044-be930d89b42a",
"image": "https://lh3.googleusercontent.com/a/AATXAJwNvpB49NrxF41KVrEFX9k1v93WoMAMBb4wBF7Q=s96-c",
"isVerified": true,
"lightningAddress": "testzebedee@zbd.gg",
"publicBio": "Welcome to my zbd.gg page!",
"publicStaticCharge": "lnurl1dp68gurn8ghj7ar9wd6zu7n9vfjkget99e5k7tmkxqhhyet3w4jhxapdwd6xzarfvvkkx6rpwfnk2ue0x56nxvrpxuervtfkxa3rgtf5xu6k2ttzxy6nstt9xsurgvejx5exydpjvc9v9tk7",
"social": {
"twitter": "gamertag",
"website": "https://example.com",
},
},
"success": true,
}
```
### Getting ZBD User Wallet Data
* Profile: `GET` [https://api.zebedee.io/v1/oauth2/wallet](https://api.zebedee.io/v1/oauth2/wallet)
* You can now call the ZBD API endpoints passing the provided `accessToken` from the previous endpoints on the request authorization header.
```json
Response: {
"data": {
"balance": "98251000",
"remainingAmountLimits": {
"daily": "1000000000",
"maxCredit": "4901749000",
"monthly": "25000000000",
"weekly": "5000000000",
},
},
"message": "Successfully fetched user wallet.",
"success": true,
}
```
It is common for software libraries and prebuilt packages to handle a lot of
this heavy-lifting for you, except for the `Getting the Token` part, which is
a true secret and should be handled in your secure backend system services.
## Integration
### Get Credentials from ZBD Developer Dashboard
In order to be able to implement `ZBD Login` functionality, you must first get your application/game's OAuth2 `Client ID` and `Client Secret`, and set up proper redirect URLs.
### Getting Keys
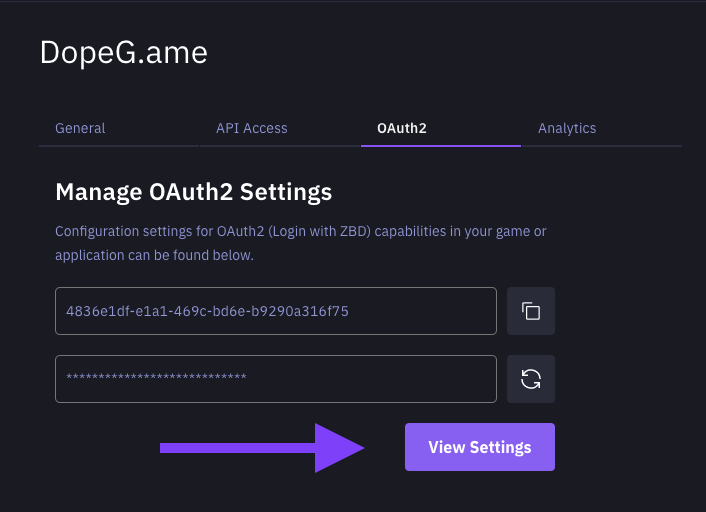
After creating a game inside of the ZBD Developer Dashboard, head on over to the `OAuth2` tab inside of that game's single details view.
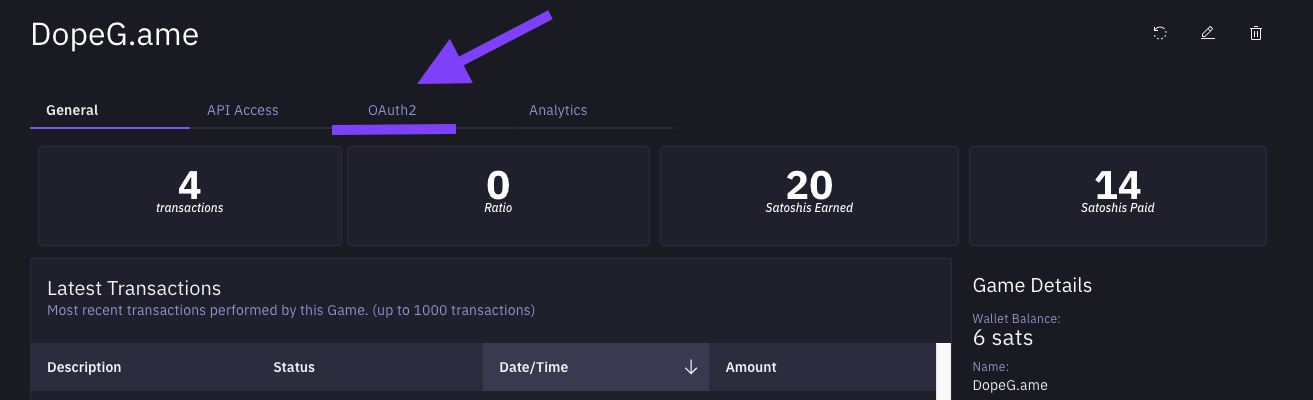
You can now get your `Client ID` (first field) and `Client Secret` (second field).
Keep your secrets secure and safe. Don't share secrets with others. Don't
commit secrets into your code.
### Setting Redirect URLs
Now its time to set up your OAuth2 redirect URLs. Head on over to the OAuth2 settings modal through the `View Settings` button.
> It is a requirement that the same redirect URL be used in the first step of the OAuth2 flow (`authorization endpoint`) - if you set a redirect URL different from the one being used when building the authorization URL, or if you don't set a redirect URL at all, the Authorization redirect will not work.
From the opened OAuth2 Settings modal, you can add up to 3 redirect URLs (whether native mobile URIs or HTTPS-based URLs). To get started use the `+` button.
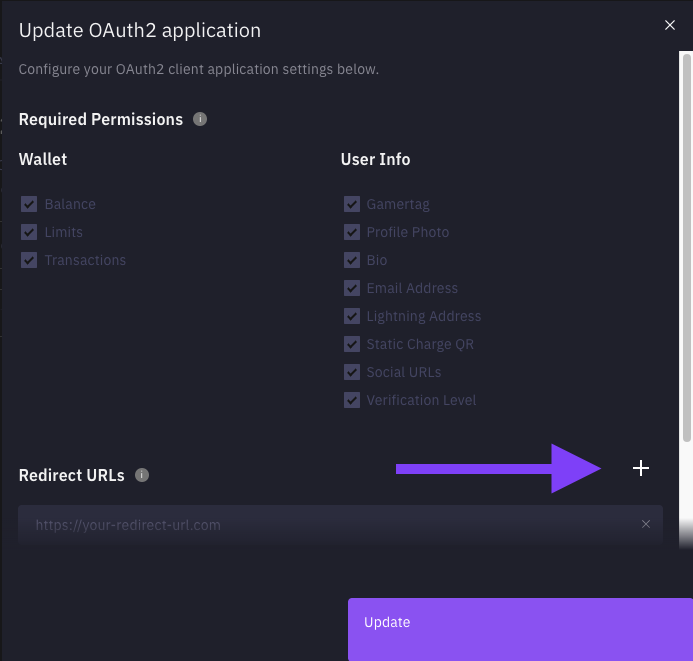
Once you've added your redirect URLs / app schemas, you can save by clicking `Update`. You're now all set up for using `ZBD Login` on your application. For more detailed examples [check out the OAuth2 Code Walkthrough for source code and LOC explanation](/rewards/oauth2/walkthrough).
# Implementation Walkthrough
Source: https://docs.zbdpay.com/rewards/oauth2/walkthrough
Detailed walkthrough of an implementation of ZBD Login.
## Client Side
When setting up OAuth2 from client side, you have two options:
* Build the entire flow yourself
* Make a request for building the [authorization URL](/rewards/oauth2/walkthrough#building-authorization-url)
* Handling the Webview with the created URL
* Getting the `code` after authenticating with ZEBEDE
* Making another request for [getting the token](/rewards/oauth2/walkthrough#getting-the-token-and-accessing-zbd-api)
* Make use of some of the available OAuth libraries available for the language you are working on, which would handle the initial steps of the flow
* Install and set up configs accordingly to the library
* If PKCE is available on the library you might receive the `code_verifier` from the response, after authenticating.
* If PKCE is not available, you might need to [build the code\_challenge and code\_verifier](/rewards/oauth2/walkthrough#building-authorization-url) yourself.
* Getting `code` as response
* Making the request for [getting the token](/rewards/oauth2/walkthrough#getting-the-token-and-accessing-zbd-api)
If you chose the second option, there are open-source libraries for handling OAuth2 on Mobile using AppAuth ([iOS](https://github.com/openid/AppAuth-iOS) and [Android](https://github.com/openid/AppAuth-Android)), as well as for React Native using [react-native-app-auth](https://github.com/FormidableLabs/react-native-app-auth).
## Server Side
### Node.js
This flow go over all the steps for Logging in with ZBD, from Building the authorization URL, with proper PKCE Keys, to getting the accessToken and calling ZBD API.
If you are using a library that provides PKCE guidelines, it will most likely be able to handle the initial flow (building auth URL and getting the code) just fine. In this case, feel free to jump to the [Token Section](/rewards/oauth2/walkthrough#building-authorization-url).
### Building Authorization URL
In case you are setting up the PKCE flow yourself (no usage of libraries), we will need to setup the `code_challenge` from a `code_verifier` which will be used later on, on token request.
```js
const crypto = require('crypto');
import OAuth from 'oauth';
function sha256(buffer) {
return crypto.createHash('sha256').update(buffer).digest();
}
function base64URLEncode(str) {
return str
.toString('base64')
.replace(/\+/g, '-')
.replace(/\//g, '_')
.replace(/=/g, '');
}
export function GeneratePKCE() {
const verifier = base64URLEncode(crypto.randomBytes(32));
if (verifier) {
const challenge = base64URLEncode(sha256(verifier));
return { challenge, verifier };
}
}
const createZBDOauth = () => {
const { OAuth2 } = OAuth;
const authorizeUrl = 'oauth2/authorize';
const tokenPath = 'oauth2/token';
const oauth2 = new OAuth2(
ZBD_CONSUMER_KEY, // CLient ID
ZBD_CONSUMER_SECRET, // Client Secret
ZEBEDEE_API_URL, // ZBD API URL: https://api.zebedee.io/v0/
authorizeUrl, // Authorization URL: oauth2/authorize/
tokenPath, // Token Path: oauth2/token
null,
);
return oauth2;
};
// Called by the app to get a url it will open in a webview/or browser
export const getZBDLoginUrl = async (userId: string) => {
// generate the PKCE key
const { verifier, challenge } = GeneratePKCE();
// save the verifier/key to the user object so we can access it when validating in the callback
await User.findOneAndUpdate({ userId }, { oauthVerifier: verifier });
const scope = 'user';
const state = userId;
const suffix = `&response_type=code&code_challenge=${challenge}&code_challenge_method=S256&state=${state}`;
const oauth2 = createZBDOauth();
// use NPM module to create the url
const res = await oauth2.getAuthorizeUrl({
redirect_uri: ZBD_REDIRECT_URL,
scope,
});
// npm module doesnt support PKCE so append the url with the code_challenge info
const url = res + suffix;
return url;
};
```
**Code explanation**
* `getZBDLoginUrl` function
* In this function, we initially Generate PKCE keys: `verifier` and `code_challenge`
* Then, `findOneAndUpdate` represents an generic ORM call for updating the User model, on the database. This way we can, afterwards, retrieve that value for getting the token.
* We then Build the URL suffix
* Url prefix and generated from `createZBDOauth`, which uses `oauth` library to do so
* `generatePKCE`
* This is where we setup PKCE Keys.
* initially we set the code verifier:
* `const verifier = base64URLEncode(crypto.randomBytes(32));`
* From the code verifier, the code\_challenge is created:
* `const challenge = base64URLEncode(sha256(verifier));`
When logging in using the provided URL, you will get a response including `state` and `code` which should be user now for getting the token, and user data:
### Getting the token and accessing ZBD API
```js
// called by ZBD oauth on login
export const zbdLoginCallback = async (payload: Object) => {
const { code, state } = payload;
try {
const user = await User.findOne({ userId: state });
const { oauthVerifier } = user;
// get the verifier generated by the PKCE script
const res = await getAccessToken({
code,
client_secret: ZBD_CONSUMER_SECRET,
client_id: ZBD_CONSUMER_KEY,
code_verifier: oauthVerifier,
grant_type: 'authorization_code',
redirect_uri: ZBD_REDIRECT_URL,
});
const { access_token } = res.data;
// get user data now we have the access token
const response = await getUserData(access_token);
const { data } = response;
const userData = data.data;
const { gamertag, email, isVerified, id } = userData;
if (!gamertag || !id || !email) {
throw new Error('gamer tag not found');
}
// save the details to the user object so we now know their email, verification etc
user.gamerTag = gamertag;
user.gamerTagId = id;
user.email = email;
user.isZBDVerified = isVerified;
user.oauthLoginDate = new Date();
await user.save();
// show a webpage that will redirect back to the app app by calling the app schema url
return {
html: path.resolve(`${__dirname}/../callback/oauth-callback.html`),
};
} catch (e) {
console.error(e);
return {
html: path.resolve(`${__dirname}/../callback/oauth-callback-error.html`),
};
}
};
```
**Code explanation**
Once the user is successfully authenticated on ZBD Client, there is a redirect back to your app, sending `code` and `state` as query params.
Those values are send as payload on this next request:
* First of all, remember we registered the verifier on the User (generic ORM update)? now we retrieve that value:
* `const user = await User.findOne({ userId: state });`
* With the proper verifier, we can now make a post request to the token endpoint, and we should have the token returned.
* `const res = await getAccessToken({…body})`
```js
export const getAccessToken = async (payload: Object) => {
const response = await axios({
method: 'POST',
data: payload,
url: `https://api.zebedee.io/v0/oauth2/token`,
headers: {
'Content-Type': 'application/json;charset=UTF-8',
},
});
return response;
};
```
* Now, by adding the accessToken to request headers, we can fetch data from ZBD API
* `const response = await getUserData(access_token);`
```js
export const getUserData = async (accessToken: string) => {
const response = await axios({
method: 'GET',
url: `https://api.zebedee.io/v0/oauth2/user`,
headers: {
'Content-Type': 'application/json;charset=UTF-8',
Authorization: `Bearer ${accessToken}`,
},
});
return response;
};
```
You are now able to proceed with your login logic and send the user data accordingly ⚡
## Code Examples
See the full source code.
See the full source code.
# ZBD Rewards SDK
Source: https://docs.zbdpay.com/rewards/sdk
Real money rewards to boost engagement and retention.
 ## Overview
The ZBD Rewards Events SDK enables you to credit rewards to your users at your discretion (any amount at any time). However, users can only *withdraw* earned rewards up to a specified threshold based on their gameplay time.
For instance, when a user first downloads the game, you may credit the user 100 sats, but they may be limited to withdraw only up to 50 sats for a few minutes.
The player’s withdrawal limit increases the longer they engage with the game. For example, after 20 minutes of gameplay, they may be able to withdraw up to 100 sats. This system enhances the SDK's security while still providing most users with a quick and easy way to earn and withdraw Bitcoin.
In the following sections, we’ll explore how to send rewards and check a user’s withdrawal limit.
# Google Play Store Guidelines
Source: https://docs.zbdpay.com/rewards/sdk/android-app-store
Instructions for successfully submitting your game to the Google Play Store.
## Overview
The ZBD Rewards Events SDK enables you to credit rewards to your users at your discretion (any amount at any time). However, users can only *withdraw* earned rewards up to a specified threshold based on their gameplay time.
For instance, when a user first downloads the game, you may credit the user 100 sats, but they may be limited to withdraw only up to 50 sats for a few minutes.
The player’s withdrawal limit increases the longer they engage with the game. For example, after 20 minutes of gameplay, they may be able to withdraw up to 100 sats. This system enhances the SDK's security while still providing most users with a quick and easy way to earn and withdraw Bitcoin.
In the following sections, we’ll explore how to send rewards and check a user’s withdrawal limit.
# Google Play Store Guidelines
Source: https://docs.zbdpay.com/rewards/sdk/android-app-store
Instructions for successfully submitting your game to the Google Play Store.
**It is very important to follow the below guidelines to ensure your game does not run into issues with app reviewers on the Google Play Store.**
# Accessing App Content
In the **App Content** section, go to **Actioned**.

After accessing **Data Safety**, click **Next** until you reach the **Data Types** section.

Expand the **App Activity** section and select **Installed Apps**.

Expand the **Device or other IDs** section and select **Device or other IDs**.

Click **Next** to proceed to **Data Usage and Handling**.
### 4. Data Usage and Handling
1. In the **Data Usage and Handling** section, expand **App Activity** and click **Start**.
2. Choose **Collected**
3. This is **NOT** processed ephemerally
4. Select **Data collection is required** (users can’t turn off this data collection) if applicable.
5. Under the reasons for data collection, select **Fraud prevention, security, and compliance**.
| Data Types | Collected | Shared | Processed ephemerally | Required or Optional | Purposes |
| ---------------------- | --------- | ------ | --------------------- | -------------------- | ---------------- |
| Installed applications | Yes | No | No | Required | Fraud Prevention |
| User IDs | Yes | No | No | Required | Fraud Prevention |
| Device or other IDs | Yes | No | No | Required | Fraud Prevention |

 ### 7. Finalizing and Saving
# Building
Source: https://docs.zbdpay.com/rewards/sdk/building
Comprehensive video guides for mastering Bitcoin apps and games with ZBD.
# Building for Android
### Minimum API Level
Make sure that the minimum API Level is set to **Android 10 API Level 29** in your settings.
### Dependencies
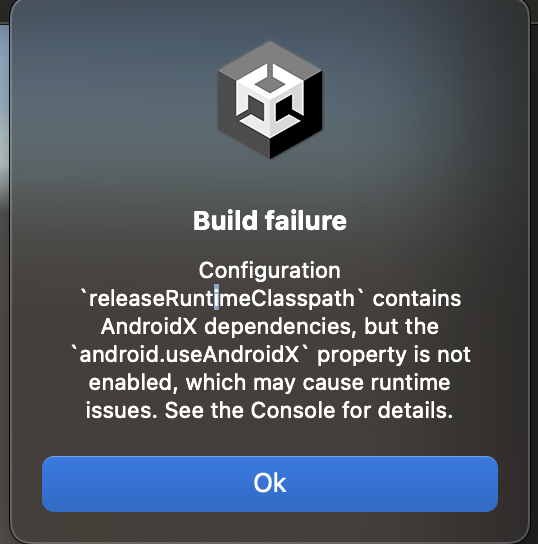
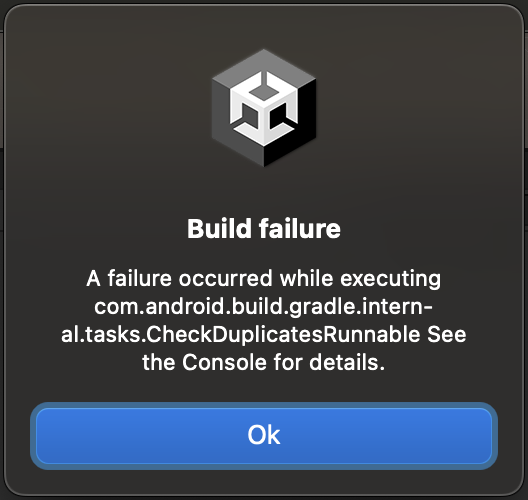
The ZBDSDK in Android requires a few dependenices to be installed. To make this as smooth as possible we included the `External Dependency Manager` in the package. This should automatically install the dependencies and deal with any duplicate classes.
However, you may need to manually resolve the dependencies by going to:
If during the build process you get build errors, specifically mentioning duplicate classes you may need to go to
# Building for iOS
### Target Minimum iOS Version
Make sure that the `Target Minimum iOS Version` is set to at least 13 in your settings.
# Compatibility
Source: https://docs.zbdpay.com/rewards/sdk/compatibility
SDK compatibility with Unity and mobile platforms.
The ZBD Rewards SDK for Unity is only compatible with **iOS** and **Android** mobile environments.
# Requirements
### Unity Version
```bash
2022 and above
```
### iOS Version
```bash
Deployment target 13 and above
```
### Android Version
```bash
Minimum Api Level OS 11/API 30 and Target API Level 34
Build settings: Stripping level to low or minimum
```
# Upgrading from Time Based SDK
If you are upgrading from the ZBD Time-based Rewards SDK version, please follow the steps outlined in this video walkthrough.
# Download SDK
Source: https://docs.zbdpay.com/rewards/sdk/download
Setup your Unity project to use the ZBD Rewards SDK
Contact your ZBD Customer Success Manager to get access to the ZBD Rewards SDK for your Unity project.
# Integrating Rewards SDK
Source: https://docs.zbdpay.com/rewards/sdk/integration
How to import and initialize the ZBD Rewards SDK.
# Import the SDK
Reach out to your ZBD Customer Success Manager to get access to the Unity SDK package.
To import a package, right-click the assets folder in Unity Editor and choose `"Import Package..."`.
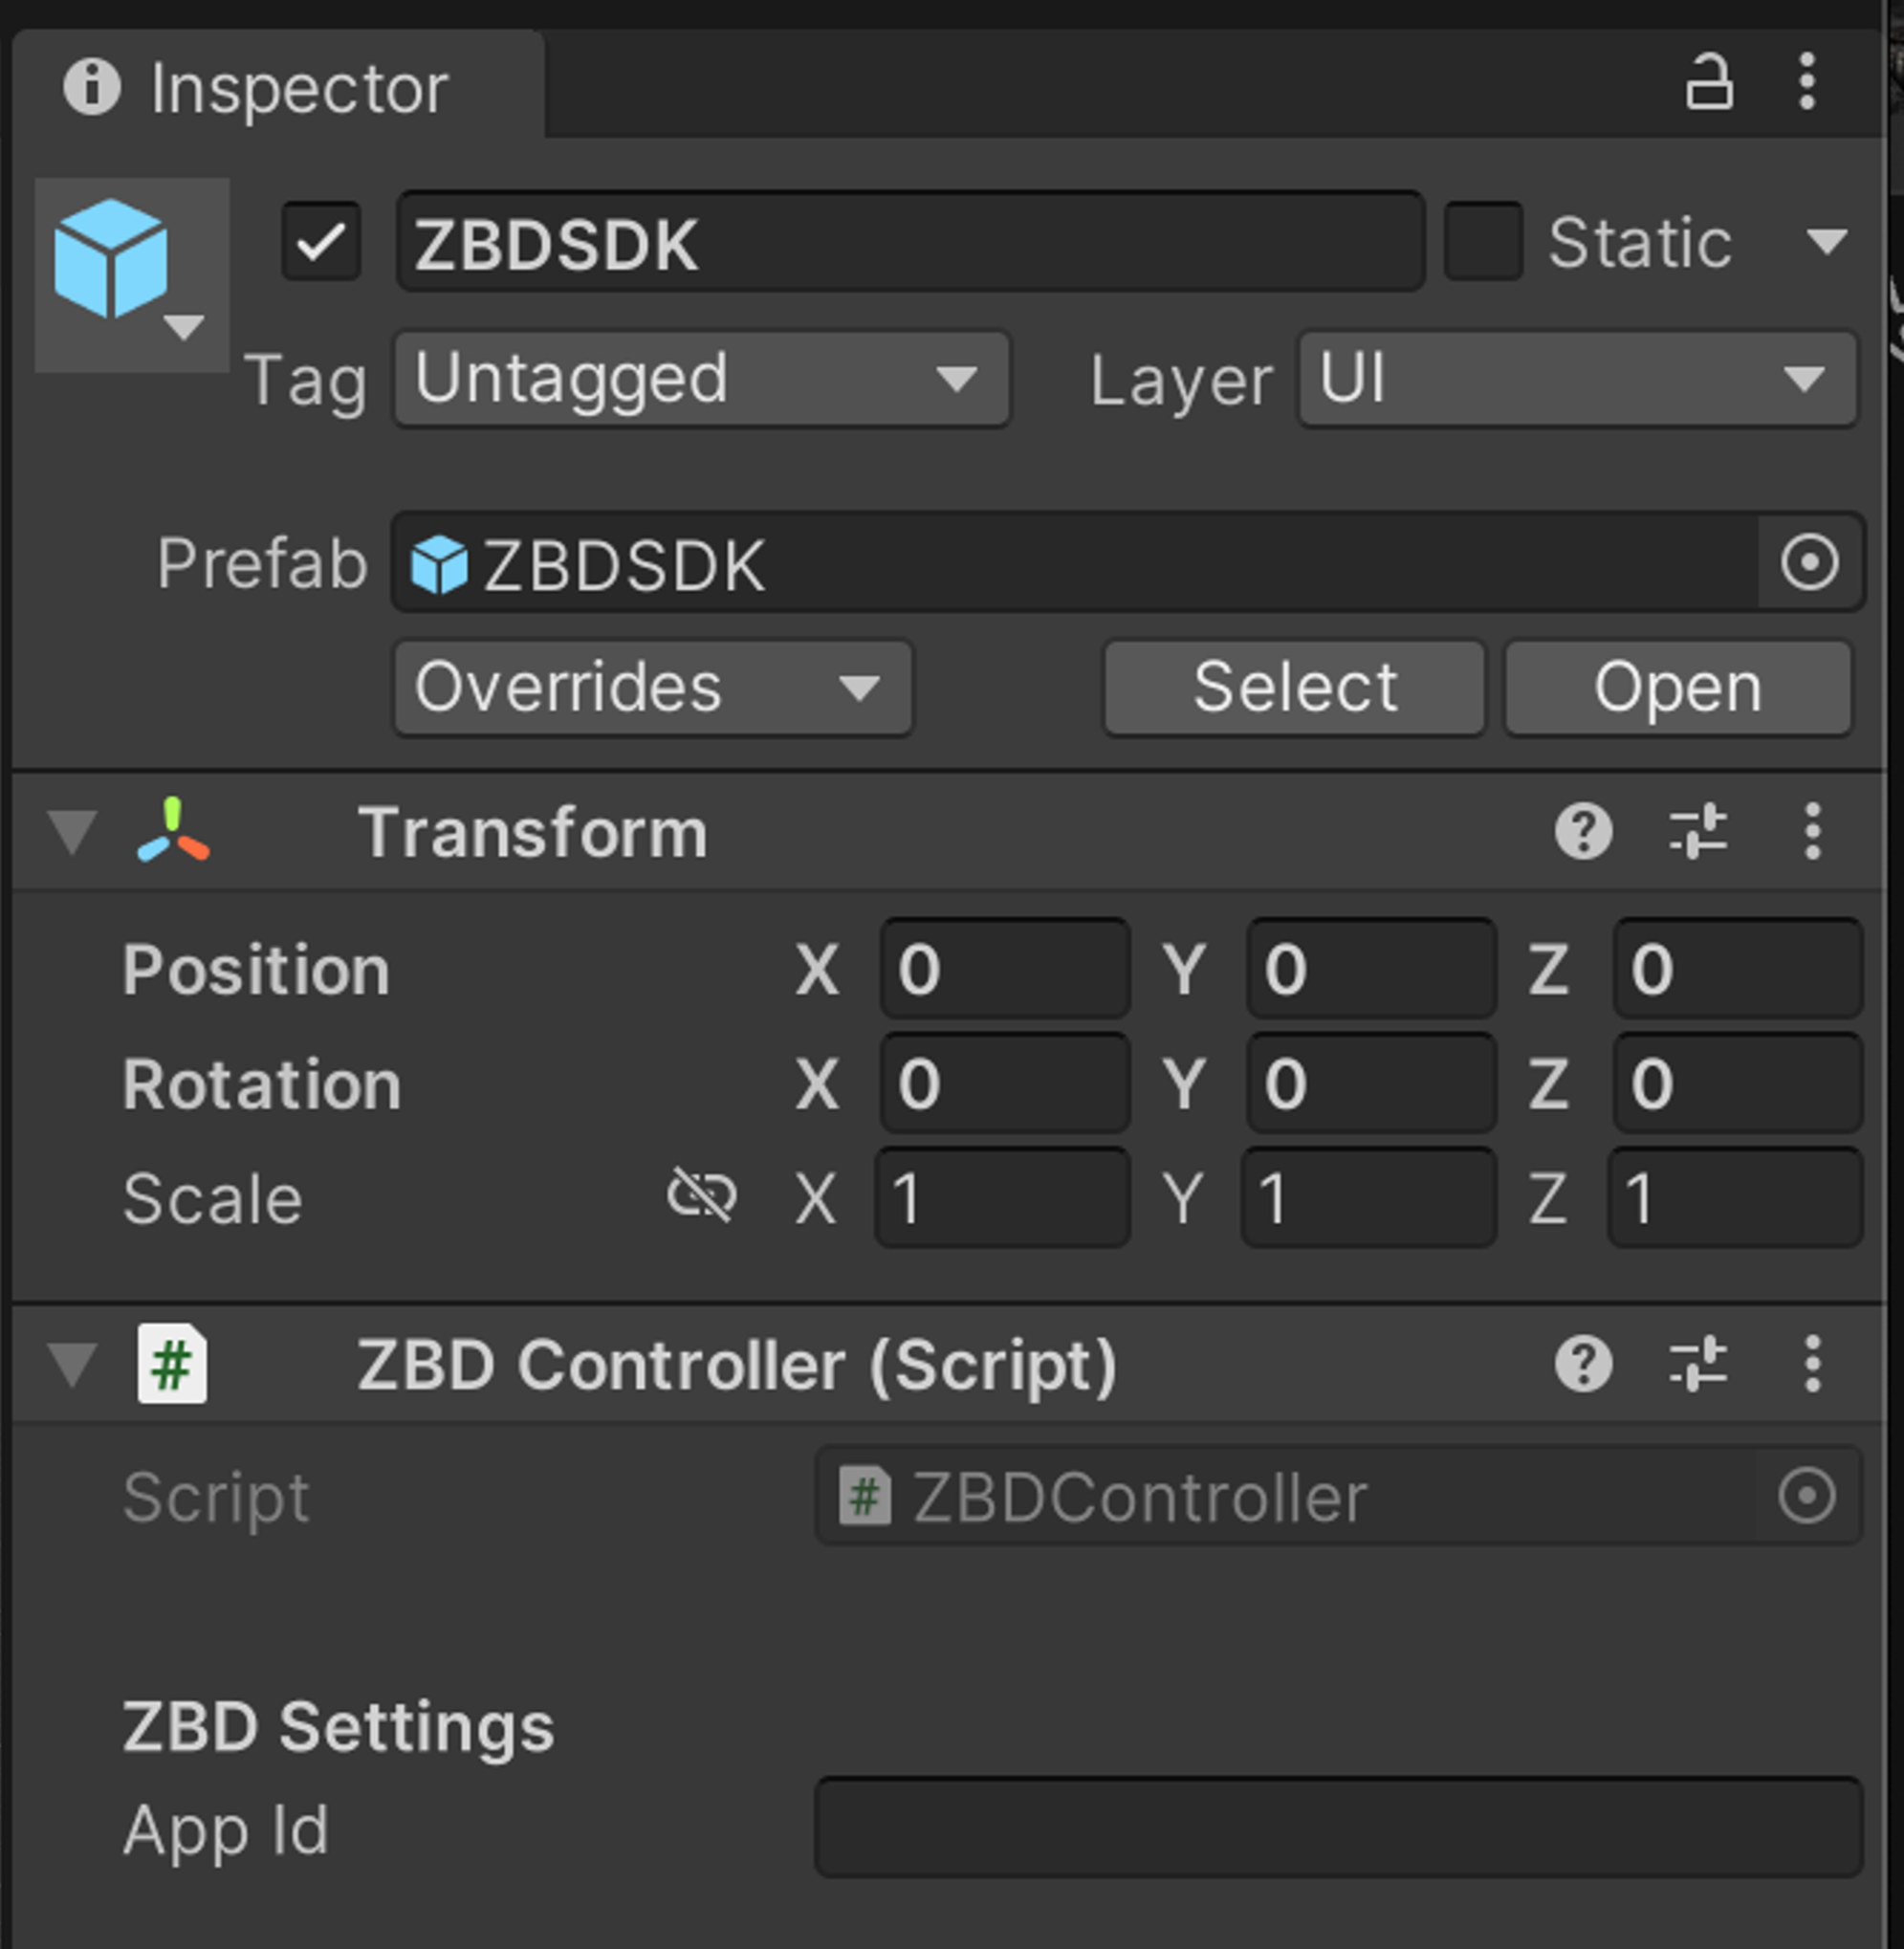
Navigate to the newly imported ZBD folder `Prefabs` and drag and drop the ZBDSDK prefab into your scene.
Due to your specific scene resolution settings and orientation you may need to resize/adjust the included UI elements. We will explain how to do this in more detail later in this documentation, but for now we are assuming the UI element has imported correctly.
# Add your App ID
You should have received your `App ID` from your ZBD Customer Success Manager. You’ll need to set this in the `ZBDController` script which is attached to the `ZBDSDK` game object in the ZBDSDK prefab.
 If you have not been given an App ID, for testing purposes only you can use the following ID:
```bash
sdkdemo.limitedachievementsats
```
# Initialize the SDK
If you have not been given an App ID, for testing purposes only you can use the following ID:
```bash
sdkdemo.limitedachievementsats
```
# Initialize the SDK
You must set the `userId` property during initialization of the SDK if you want ZBD to share event data for your users (e.g. `user signed up for ZBD app`).
`userId`: this is **your internal userId** that can be attributed to a ZBD user.
Please reach out to your ZBD Customer Success Manager if you face any issues.
Once the ZBDSDK prefab is added you can initiate the SDK from another script, such as your main controller, via the following call:
```csharp
// Initialize the SDK with your internal userId
using ZBD;
ZBDController.Instance.Init(userId, completion =>
{
if (completion.success) {
Debug.Log("success");
} else {
Debug.LogError(completion.error);
}
}
);
```
### Initializing SDK without `userId`
You can also set the `userId` at any time after initialization by calling:
```csharp
ZBDController.Instance.SetUserId("user_id");
```
```csharp
using ZBD;
ZBDController.Instance.Init(completion =>
{
if (completion.success) {
Debug.Log("success");
} else {
Debug.LogError(completion.error);
}
}
);
```
This will allow the user to start earning, however **in order to withdraw they will need to download the ZBD app, get their ZBD Gamertag and register it with the ZBD Rewards SDK**.
The easiest way to do this is to present the ZBD modal. If the user has not registered their ZBD Gamertag then they will be guided through it inside the modal.
### Presenting SDK Modal
```csharp
ZBDModalController.Instance.ShowModal();
```
`ShowModal()` will present a modal prompting the user to enter a ZBD Gamertag, or to sign in if they were not signed in automatically.
Users can also **view their balance** and **initiate a withdrawal** from this modal.
### Detecting Modal Visibility
You may want to stop the gameplay or trigger some other event when the SDK modal becomes visible. You can **detect when the modal is visible** via 2 methods:
**Subscribe to the `ModalIsVisible` event**
```csharp
private void Start()
{
ZBDController.Instance.ModalIsVisible += WebViewVisible;
}
void WebViewVisible(bool visible)
{
// handle event here
}
private void OnDestroy()
{
ZBDController.Instance.ModalIsVisible -= WebViewVisible;
}
```
**Invoke `IsModalVisible()`**
You can also call `IsModalVisible()` to check the status of the modal.
```csharp
ZBDModalController.Instance.IsModalVisible();
```
**Android Back Button**
In Android you can detect whether the modal is open and close it with the following code snippet.
```csharp
if (Input.GetKeyDown(KeyCode.Escape))
{
if (ZBDModalController.Instance.IsModalVisible())
{
ZBDModalController.Instance.CloseModal();
}
}
```
# Apple App Store Guidelines
Source: https://docs.zbdpay.com/rewards/sdk/ios-app-store
Instructions for successfully submitting your game to the Apple App Store.
**It is very important to follow the below guidelines to ensure your game does not run into issues with app reviewers on the Apple App Store.**
# Privacy Policies
Apple announced that starting [Spring 2024](https://developer.apple.com/news/?id=3d8a9yyh), it will require its developers to declare the reasons for using certain APIs (aka Required Reason APIs) that could be misused to collect data about users' devices within privacy manifest files.
**This needs to be done when integrating the ZBD Rewards SDK.**
Once your Xcode project has successfully built, follow these steps:
Right click the new `PrivacyInfo` file and select `Open As -> Source Code` then copy and paste the following.
Add or change any values below based on what your game is doing!
More information on this Apple policy can be found here: [Apple Developer Documentation](https://developer.apple.com/documentation/bundleresources/privacy_manifest_files).
```xml
NSPrivacyTracking
NSPrivacyTrackingDomains
NSPrivacyCollectedDataTypes
NSPrivacyCollectedDataType
NSPrivacyCollectedDataTypeDeviceID
NSPrivacyCollectedDataTypeLinked
NSPrivacyCollectedDataTypeTracking
NSPrivacyCollectedDataTypePurposes
NSPrivacyCollectedDataTypePurposeAppFunctionality
NSPrivacyAccessedAPITypes
NSPrivacyAccessedAPIType
NSPrivacyAccessedAPICategoryFileTimestamp
NSPrivacyAccessedAPITypeReasons
C617.1
```
Your game should now be able to be submitted to the Apple App Store!
If you have any questions, don't hesitate to reach out to your ZBD Customer Success Manager.
# Security
Source: https://docs.zbdpay.com/rewards/sdk/security
Security features and best practices for the ZBD Rewards SDK.
It’s important to explain the security assumptions of the SDK and to reiterate that no game is 100% secure—especially when real-money rewards are involved.
If you do not call the **`SendReward`** endpoint from your own backend server, it must be called from the client, which exposes it to abuse. A malicious attacker could potentially call this endpoint multiple times to reward themselves the maximum amount of Bitcoin.
To mitigate this, **we limit how much a user can withdraw based on how long their device has been online.**
For example, a user may attempt to reward themselves 10,000 sats, but they will only be able to withdraw 2 sats per 5 minutes of "Time Alive", effectively slowing down withdrawals to prevent farming.
# Time Alive
When your app/game is open, the SDK sends a “ping” to the ZBD backend roughly every 20 seconds. This allows the SDK to calculate how long it has been online in a way that cannot be easily spoofed.
Additionally, we use Apple and Google attestation systems to verify that the device is genuine and is running a non-rooted and non-jailbroken OS.
This further restricts malicious users, as they are only able to withdraw a maximum of **X sats every Y minutes per Z real devices**.
However, a more sophisticated operation may involve hundreds of genuine devices kept online in an attempt to farm rewards while passing attestation checks.
To help mitigate this, we can toggle additional verification steps such as CAPTCHAs or facial recognition at the point of withdrawal. We also monitor network and IP address activity —- but none of these measures are foolproof. A determined attacker may still find ways to bypass them.
This is why we **strongly recommend (almost require) calling the `SendReward` method from your own secure backend servers** and providing us with the IP address of that server, so we can restrict access to only trusted sources.
# Attestation
In order to make sure we have everything we need to detect your app/game has not been tampered with as part of our attestation check, we require a couple of pieces of information.
### Android
For Android we need your Bundle ID or package name i.e. `com.domain.appname` -- this is what you set in your Unity build settings.
We also need the SHA256 hash of your app signing key.
To find your app's SHA256 hash key for Google Play:
Find the `App signing key certificate` section and copy the SHA-256 fingerprint.
For development purposes you can generate a SHA256 hash key for your keystore using the following command:
```bash
keytool -list -v -keystore path/to/your.keystore -alias your_alias -storepass your_keystore_password -keypass your_key
```
It should look something like this
```bash
EA:A1:69:AA:2F:FC:6D:16:84:ED:06:11:E0:65:2B:E0:BB:9C:5B:E3:41:96:06:E2:3D:85:8F:2C:22:2A:E9:86
```
### iOS
For iOS we need your Bundle ID (`com.domain.appname`) and your Team ID.
To find your app's Team ID:
Copy the code from the `Team ID` section.
# Sending Rewards
Source: https://docs.zbdpay.com/rewards/sdk/send-rewards
Instructions for sending rewards to users with the ZBD Rewards SDK.
# Reward Unit
In the ZBD Rewards SDK, rewards are sent as units. A unit is a configurable value determined by your ZBD Customer Success Manager and can represent different amounts, such as 1 satoshi or \$0.10.
For example, **if the game is configured so that 1 unit = 1 satoshi, sending 1 reward will send 1 satoshi**. Conversely, if the game is set up so that `1 unit = $0.10`, sending 1 reward will send the equivalent of \$0.10 in satoshis.
# Sending Rewards
To send a reward to a user you can call:
```csharp
ZBDController.Instance.SendReward(1, callback =>
{
if (callback.success)
{
// reward sent
}
else
{
Debug.LogError("send reward error " + callback.message);
}
});
```
However, for improved security it is recommended (almost required!) that you call the `SendReward` API from your app's/game's server after validating actual gameplay.
This can be done using the users ZBD SDK ID which you can obtain after initialization has completed.
```csharp
ZBDController.Instance.Init("customUserId", completion => {
if (completion.success) {
string sdkUserId = completion.userId;
}
});
```
```jsx
curl --location 'https://api.zebedee.io/api/v1/rewards/limited-achievement/reward' \
--header 'Content-Type: application/json' \
--data '{"rewardsUserId":"USER ZBD SDK ID","amount": 1}'
```
Without calling `SendReward` from your backend server the security model downgrades to only relying on device attestation and the withdrawal limit based on time the device is active. More information on this can be found in the [Security](/rewards/sdk/security) section.
# Troubleshooting
Source: https://docs.zbdpay.com/rewards/sdk/troubleshoot
General troubleshooting guides for the ZBD Rewards SDK.
# Build Issues
* If you encounter build issues, it is important to check that the Android and iOS deployment targets and minimum API level are set properly. Refer to [Compatibility](/rewards/sdk/compatibility) for more information.
* If you receive a sign up error, please confirm that your Bundle ID / Package Name is the same as the one used whilst setting up the SDK configuration.
* Make sure the stripping level is set to low or minimum in the Unity build settings.
If you get the following build errors on Android please check the **[Building for Android](/rewards/sdk/building#building-for-android)** section.
# Performance Issues
The ZBD Rewards SDK forces hardware acceleration in Android builds, this can cause some issues with games.
If you notice performance issues after integrating the ZBD Rewards SDK you can delete the `ModifyUnityAndroidAppManifestSample.cs` file in the `Assets/Editor/` folder.
# Retrieving User Balance
Source: https://docs.zbdpay.com/rewards/sdk/user-balance
Instructions for retrieving user balances from the ZBD Rewards SDK.
To check the balance of a user you can invoke `GetBalance()`:
```csharp
ZBDController.Instance.GetBalance(callback=>
{
if (callback.success)
{
// the users balance in satoshis (not millisatoshis)
Debug.Log(callback.balance);
}
else
{
Debug.LogError("get balance error " + callback.message);
}
});
```
# Retrieving User Status
Source: https://docs.zbdpay.com/rewards/sdk/user-status
Instructions for getting the user status with the ZBD Rewards SDK.
To retrieve the SDK user status you should use the `GetUserStatus()` function.
```csharp
ZBDUtilities.Instance.GetUserStatus(callback =>
{
if (callback.success)
{
Debug.Log("user status success");
Debug.Log(callback.data.status);
if (callback.data.status == ZBDConstants.ZBD_LINKED_STATUS)
{
Debug.Log("zbd linked");
}
}
else
{
Debug.LogError("user status error " + callback.message);
}
});
```
This returns a `ZBDUserStatusResponse` object which contains a `ZBDUserStatus` object that has following data:
```csharp
public class ZBDUserStatusResponse
{
public bool success { get; set; }
public string message { get; set; }
public ZBDUserStatus data { get; set; }
}
public class ZBDUserStatus
{
// the user's linked status
public string status { get; set; }
// the user's sdk id
public string rewardsUserId { get; set; }
// the user's zbd id
public string zbdUserId { get; set; }
}
```
# Status Types
The `status` parameter can be:
* **`unlinked`**: User has not signed up for rewards, meaning they have not clicked Start Earning
* **`linked`**: User has signed up for rewards, meaning they have clicked Start Earning
* **`zbdlinked`**: User has signed up for rewards, clicked Start Earning, and linked their ZBD account
# Retrieving Withdrawal Limit
Source: https://docs.zbdpay.com/rewards/sdk/user-withdrawal
Instructions for retrieving user balances from the ZBD Rewards SDK.
You can also check the withdrawal limit of a user from the `GetBalance` response by checking `callback.withdrawalLimit`.
```csharp
ZBDController.Instance.GetBalance(callback=>
{
if (callback.success)
{
// the users withdrawal limit in satoshis (not millisatoshis)
Debug.Log(callback.withdrawalLimit);
}
else
{
Debug.LogError("get balance error " + callback.message);
}
});
```
# Walkthrough
Source: https://docs.zbdpay.com/rewards/sdk/video-walkthrough
Video instructions for integrating the ZBD Rewards SDK into your Unity project.